Each Robin meeting room is tied to a shared resource calendar on your Exchange server. This makes it easy to add the room to meeting invitations and book space through either Outlook or Robin.
Overview
Each room you want Robin to manage will need a room resource calendar. If you already have them, skip ahead to the configuration steps.
- Create a room resource
- Configure each room
Creating a room resource in Exchange
If you don't already have room resources for your office, they're easy to set up. There are two ways to create room resources in Exchange versions 2007 and 2010, via shell or console.
Shell
Open Exchange management shell. Run the command:
New-Mailbox -Name 'Conference Room' -Alias 'conference_room' -UserPrincipalName 'conference_room@your_domain' -SamAccountName 'conference_room' -FirstName 'Conference' -Initials '' -LastName 'Room' -Equipment
Make sure 'your_domain' is the domain of your organization, and fill in the "Conference Room" fields with the room's details.
Console
- 1
- On the Exchange Server, open up Exchange Management Console (EMC). This is different from the Exchange Admin Console (EAC), but you can do similar steps there too.
- 2
- Navigate to Recipient Configuration>Mailbox

- 3
- On the right “Actions” pane, click “New Mailbox”

- 4
- Select “Room Mailbox”

- 5
- Select “New User”

- 6
- Enter information about your conference room(s)
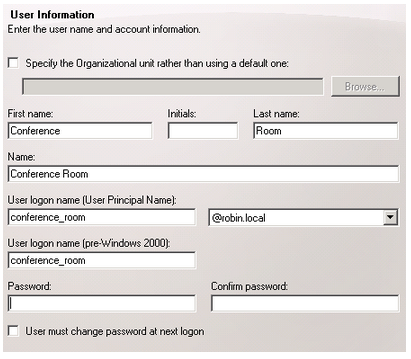
- 7
- Enter an alias for the mailbox. This can be something like “conference_room”, “call_room”, etc.

- 8
- Finish the setup and the room should be created. Repeat until you've created resource mailboxes for all of your bookable rooms.
Configure each room
Once you have room resources established for your rooms, you'll want to configure them to include important details like title, description, privacy settings, prevent conflicts, etc. The following configuration ensures this information is passed through to Robin.
All rooms via shell
Open Exchange management shell. Run the command:
Get-Mailbox -RecipientTypeDetails RoomMailbox |Set-CalendarProcessing -Identity "conference_room” -AddOrganizerToSubject $false -DeleteSubject $false -DeleteComments $false -RemovePrivateProperty $false -DeleteAttachments $false -AutomateProcessing AutoAccept
Single room via shell
Open Exchange management shell. Run the command:
Set-CalendarProcessing -Identity "conference_room” -AddOrganizerToSubject $false -DeleteSubject $false -DeleteComments $false -RemovePrivateProperty $false -DeleteAttachments $false -AutomateProcessing AutoAccept
Single room via console
- 1
- Right-click the room resource you wish to modify in EMC and click “Properties”

- 2
- Navigate to the “Resource Information” tab and uncheck the following:
- Delete attachments
- Delete comments
- Delete the subject
- Add the organizer’s name to subject
- Remove the private flag on an accepted meeting

- 3
- Optional: To enforce booking/cancellation policies enable the Resource Booking Attendant in the “Resource General” tab.

Next up
Pair your room resource calendars with spaces in Robin.